

Flutter Google Maps Development and its Integrations steps ?
Flutter Google Maps
A map is used to get information about the world simply and visually. It presents the world places by showing its shape and sizes, locations and distance between them. We can add a map in our application with the use of the Google Maps Flutter plugin. This plugin can automatically access the Google Maps servers, map display, and respond to user gestures. It also allows us to add markers to our map.
Why use Google Maps with Flutter?
Flutter developers prefer Google Maps for their application because they provide native performance for android and iOS both. It allows us to implement the code one time and permit them to run the code for both devices (android and iOS). Google Maps Flutter plugin is provided in the Google Map widget that supports initialCameraPosition, maptype and onMapCreated. We can set the position of the camera and marker in any place on the earth. We can design the marker according to our choice. It also comes with a zoom property in a cameraposition to provide the zooming in google map view on the initial page.
Let us see step by step to how to add Google Maps in Flutter application.
Step 1: Create a new project. Open this project in the IDE, navigate to the lib folder, and then open the pubspec.yaml file for setting the map.
Step 2: In pubspec.yaml file, we need to add the Google Maps Flutter plugin in the dependency section, which is available as google_maps_flutter on pub.dartlang.org. After adding a dependency, click on the get package link to import the library in the main.dart file.
It ensures that we have left two spaces from the left side of a google_maps_flutter dependency while adding the dependencies.
Step 3: The next step is to get an API key for your project. If we are using an Android platform, then follow the instructions given on Maps SDK for Android: Get API Key. After creating the API key, add it to the application manifest file. We can find this file by navigating to android/app/src/main/AndroidManifest.xml as follows:
Step 4: Next, import the package in the dart file as below:
Step 5: Now, we are ready to add a GoogleMap widget to start creating a UI to display the map.
Example
Let us understand it with the help of an example.
In the above code, we have noticed these terms:
mapController: It is similar to other controllers that we had seen in Flutter. It controls all activities on the GoogleMap class. Here, it manages the camera function, such as position, animation, zooming, etc.
onMapCreated: It is a method called for creating a map and takes a MapController as an argument.
initialCameraPosition: It is a required parameter that sets the camera position from where we want to start. It allows us to set which part of the world we want to point on the map.
stack: It is used to place other Flutter widgets on top of the map widget.
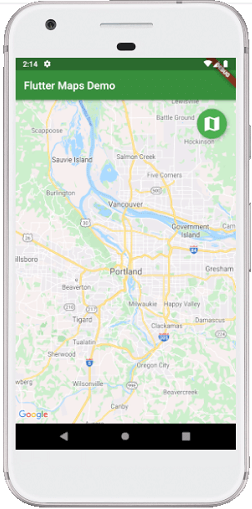
Output:
When we run the app, it should return the UI of the screen as below screenshot:
How to change the map appearance?
We can change the map appearance such as normal view, satellite view, etc. using mapType property. This property allows developers to display the type of map tiles. The GoogleMap widget offers mainly five types of tiles, which are given below:
- none: It does not display any map tiles.
- normal: It displays the tiles on the map with traffic, labels and subtle terrain information.
- satellite: It displays the satellite image (aerial photos) of the location.
- terrain: It displays the specific physical features of an area of land (indicates type and height of terrain).
- hybrid: It displays the satellite images with some labels or overlays.
We can do this by creating a variable _currentMapType in the above code to display the current map type and then add mapType: _currentMapType to the GoogleMap widget.
Next, we have to add a method to modify the value of _currentMapType inside a setState() function call. This method will update the map appearance for matching with the new value of _currentMapType variable.
Finally, replace the onPressed property with _onMapTypeButtonPressed.